+(800x599).jpg)

Sunday, June 29, 2014
Armageddon Pattern Basilisks part 7
Putting the bits and pieces together. Looking more like the whole.
Saturday, June 28, 2014
blog roll
If you'd like your blog added to "Immortals amongst us" on the right. Post the link here and it'll be added within a day.
slainte mhath
slainte mhath
Thursday, June 26, 2014
Making Wave Serpents, How to
So you bought some falcons online and want to make them into wave serpents. Here's one take on converting them.
+(800x422).jpg)
Wednesday, June 25, 2014
+(800x237).jpg)
Tuesday, June 24, 2014
Sprucing up Falcons
X-Wing models are decently painted in my opinion. There's variation from model to the other. Overall they are quite uniform.
+(800x458).jpg)
Sunday, June 22, 2014
Armageddon Pattern Basilisks part 6
Had a damn good solid session with these guys the other night. Felt good. Really good.
+(441x800).jpg)
Saturday, June 21, 2014
blog roll
If you'd like your blog added to "Immortals amongst us" on the right. Post the link here and it'll be added within a day.
slainte mhath
slainte mhath
Friday, June 20, 2014
Drop pod how to.
The drop pod has been taking longer then it deserves as I get to only make noises with it when it first arrives. My landraider didn't take this long and I painted the inside of it. So what follows is my break down on painting, and assembling a drop pod. Mostly assembly.


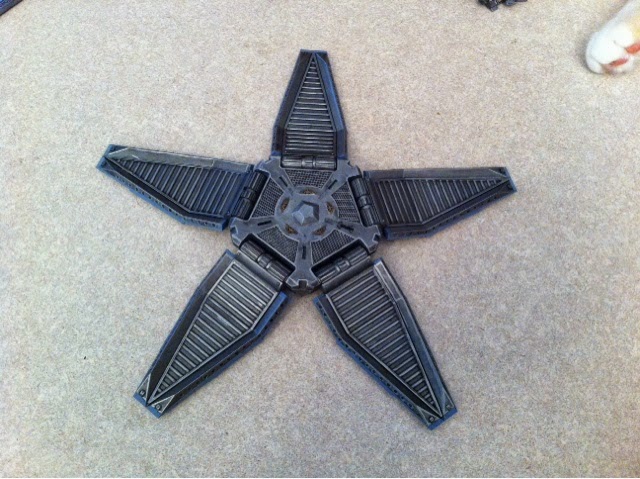


First I have my assistant helping me here arrange all of the pieces of a drop pod for you to see laid out. The doors, upper engine, and harness have been glued together, the rest are free floating for painting.
My assistant is not of the greatest help.
Now skipping that whole painting process, here are the mostly finished pieces. Weathering and chipping will come later.
Now the model was dry fitted for this process as more painting was required before final assemblage, and to show how well the model goes together with though and preparation.
Here is the bottom of the model with the doors put in place. Now you would glue the pod floor to the entry thrusters. Mind blowing I know.
Next you can assemble the control core, and harness. Don't worry about glueing these to one another. They will fit well together, and you will want the harness to be able to be tweeked alittle coming up. You can glue the core in place though. I have just one in the picture for example of the models, I guess size, dimensions, roominess, doesn't matter put them in all at once its easy.
Now you can do this step at any point once painted. The upper engine, and gun mount go together with the insertion of the nose for the turbine blades. Put some glue just on the end of the turbines bit and join the pieces together. This way you can properly sweval the gun at the enemy when it fires. So you can still make some sound effects after it deploys.
Here we are now beginning to finish the assembly. Fit the engine unto one of the fins. Once dry fit another into the engine and put in place on the rest of the model. Here you will be able to fiddle with the unglued harness to fit the fins bottom, middle which a connects with a hose from the harness, and it's top at once. Helping to lock it in place.
Now since this is an imperial design you. Must have rubber bands on hand otherwise you've just made it harder for yourself. Wrap a couple around at key places of joining, while pressing in pieces at proper places to get them uniformly joined. I also recommend to help keep the doors from being to loose or off kilter, make sure during this step to get the locks at the top of the door to fit in to the squares on the engine. You'll hear the click when they fit together.
Perhaps I've bee instructional to some extent and will help others in the future if you ever build one of these kits.
Wednesday, June 18, 2014
Armageddon Pattern Basilisk part 5
Wasn't able to do accomplish as much was I wanted last night. Had an issue with the red.
+(631x800).jpg)
Tuesday, June 17, 2014
How to Magnetize Wave Serpent/Falcon/Fire Prism Weapons
Here's a how to that may help some Eldar players out there.
+(800x341).jpg)
Monday, June 16, 2014
+(762x800).jpg)
Sunday, June 15, 2014
blog roll
If you'd like your blog added to "Immortals amongst us" on the right. Post the link here and it'll be added within a day.
slainte mhath
slainte mhath
Friday, June 13, 2014
How to Paint Metal Bits Fast
This is something I've been doing for awhile. Thought about this post during the land raider US but it was too late to take pics without redoing everything. Fortunately another commission has afforded me the same opportunity.
+(800x632).jpg)
Tuesday, June 10, 2014
My name is Nate, and I have too many models
JJ introducing, 40kers, bloggers, painters and modellers, we are
extremely fortunate to introduce a new member to our sandbox. His name
is Nate and he is a fantastic painter. I've known Nate for a couple of
years now and am always looking to chat with him. An all around great
guy and excellent teacher. I personally believe he's a far better
painter than I am. Should SGP ever become a full-fledged painting
studio he'll be the first I'll ask to join. Please give a warm welcome
to Nate!

Hi my name is Nate, and I have too many models to paint. But don't we all. So JJ has asked me to start writing a weekly post on here, so sure why not. I've only been blogging for a little bit at my own blog thedarkenvault.blogspot.com/?m=1 which I've been lazy with since adepticon. So back at it.
Hi my name is Nate, and I have too many models to paint. But don't we all. So JJ has asked me to start writing a weekly post on here, so sure why not. I've only been blogging for a little bit at my own blog thedarkenvault.blogspot.com/?m=1 which I've been lazy with since adepticon. So back at it.
The
next couple weeks I figure I will show off what I'm going to be doing
getting some new stuff done for my space wolves for Waagghh! Fest on
June 28th.
First here is a new
wolf guard model I just finished, and some of the stuff to get worked
on. Brule Spearslayer, and a drop pod were I will try and show my whole
process of assembly.


+(800x599).jpg)
Sunday, June 8, 2014
+(800x241).jpg)
Saturday, June 7, 2014
blog roll
If you'd like your blog added to "Immortals amongst us" on the right. Post the link here and it'll be added within a day.
slainte mhath
slainte mhath
Friday, June 6, 2014
+(800x707).jpg)
Wednesday, June 4, 2014
How to Airbrush a Star
When Nate said he wanted a star somewhere on his land raider first thought was one of faded edge stars. You see them as tattoos, banners, flags, etc. Thought it would be a good challenge.
+(800x598).jpg)
Tuesday, June 3, 2014
+(800x273).jpg)
Sunday, June 1, 2014
Beaten Brass Muzzles, How to
Sometime ago I saw a Baal Predator with this really cool beaten brass panel. Wanted to replicate. Decided to give it a go.
+(800x402).jpg)
Subscribe to:
Posts (Atom)