

Was surprised how quickly the Fire Prism was painted this evening. I have a feeling I'm missing something Big with the paint. Looked it over twice before putting a fork in it.
I tried a new technique with it today. Which I promptly butchered. Only the perceptive eye will catch the problem. The technique taught me a lot and was very happy with the results, except the ending. Still looks damn good! Not as good if it was one of my models. Shawn's lucky. After I did I looked it and my immediate reaction was to grab a hammer and beat the model into pieces. Yes, I F*ck#d up that seriously that if it was my model I would've scraped it via destruction and spent the 50$ to buy another and start all over again to not make the mistake ever again. Yes. I think it's that bad of a mistake. Perhaps you'll catch it.
Let's start off with a pic taken last night. View of cockpit before colour.

Target lock on top of Heads up display is Blood Red. Screen is Scorpion Green. Ice Blue for separate between screen and buttons. Right arrow Golden Yellow. Left arrow Knarloc Green Foundation. Bulb is Dwarven Brass.

Star Wars Luke Skywalker targeting device painted Chaos Black.

That's it for interior. Now time to get it all painted!

Something new I've never done before. I'm adding racing stripes to the Fire Prism. Always liked the Saim Hann black strips. Wanted to try something new and different. Shawn seemed to like it at the time. Wanted to use Alaitoc stippling design for the racing stripe. There will be two stripes. One is considerably wider then the other. Its designed to use the open space of the Fire Prism. Surprised how well it turned out. Also surprised how well it didn't work out.
Magic! Blue tape! 40k buddy Wade uses this stuff when airbrushing his Valkyries. Very smart. He's a good painted despite his comments to the contrary.

This took some time. As in A Lot of time. Eventually I figured it out. Unfortunately cannot provide any useful information since this is my first time using it. Will have more info on the Wave Serpent. Only thing I can suggest right is to breathe. You will be doing this for awhile.

Now time for other side of the wide stripe. Suggest to curl the second piece of blue tape under the canopy so it doesn't get in the way. There has to be an easier way to do this. I didn't research it. I just jumped in. Anyone has suggestions feel free to share. Will probably research some next week. Have to work on my VtM game at work tomorrow. Start my game tomorrow and need to a lot of work on it before its ready. As the meme says: If it wasn't for the last minute nothing would get done.

Now time for my stippling brush. Don't let me fool you. This isn't a special brush like the one GW produces. Please save yourself the 8$ and head to your crafts store (see pic) to pick up this bad boy. He's awesome!

Seriously don't know where I picked him up or how much he cost /cough 4$ /cough.

Grab some paint on your bristles and time to tap the paint off on your piece of cardboard or other pallet. The piece of cardboard is the ripped cover of a razorback. Perhaps someday I'll show the other side for funnsies. You are tapping the brush on the cardboard to rid the brush of excess paint. I prefer to use circular patterns, which you'll see later, so I can tell when the paint is wearing away.

Time to stipple the Fire Prism. Same as piece of cardboard. Tap the bristles on the strip that the blue tape isn't covering. Be careful because if you're too aggressive, like I was, you'll end up getting paint under the "edge lock." This is bad because you won't have the crisp line you want.

Here are the paints I used for the racing stripe. 2nd fade of Dark Angels Green. 1 to 5 Sunburst Yellow to Dark Angels Green. Second is Goblin Green.

An idea of how much paint I pull from the shelf of the pot on my stipple brush.

Better picture of my circles of stippling to remove paint from the brush.

Now time for the second green to cover the base to give it that Alaitoc stipple pattern. It should be noted Alaitoc uses three blues. I only used two greens. Using the same side of the colour wheel when painting Shawn's Craftworld vehicles.

Rip it off girl! Surprisingly solid. Perhaps I'll hit the black lines between the plates to make them stand out. Or not. As you can see. Half of the racing stripe is on the front of the skimmer. Note the entire width. Only for the body to present the full width of the stripe. Turned out surprisingly well for my first time trying this.

Now for the thinner line. First racing stripe is thick. Second is thin, again like Saim Hann.

Again stippled 3rd Dark Angels Green as base.

First layer is Goblin Green and Viola! Looking great.

Now time for me to make a tough call. Do I have enough skill to pull off the racing stripes on multiple levels? At first I decided against then. Then decided F! it in for a penny....

Looks great!

Completed second stripe all is good with model.

Time for the finishing touch. I always do eyes last. That breathe of life from creator to haemonculi. This time it was Caledron Sky for all the bulbs on Shawn's Craftworld. Something we cam up with together. Great idea, Shawn! It's going to be the unifying colour amongst his Eldar along with Surf Aqua.
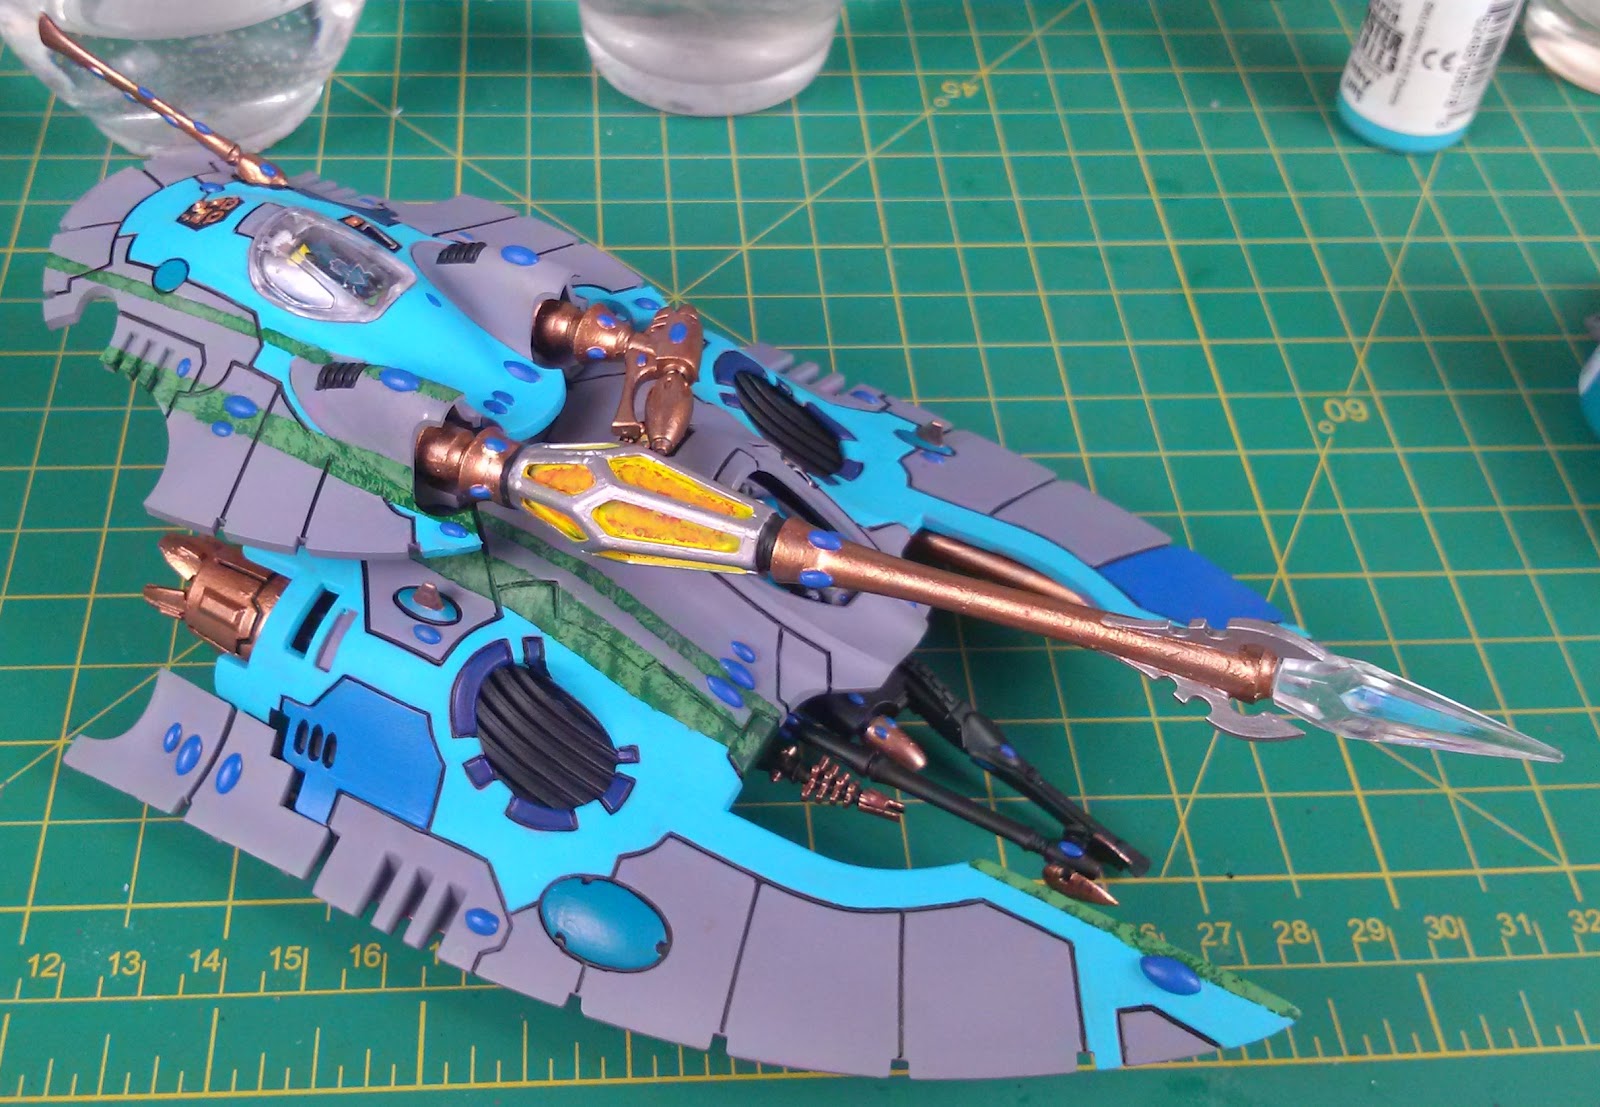
Other side of Fire Prism.

Bad ass fire prism cannon pointing at you ready to do its damage.

Time: 4 hrs 3 July. 2 hrs 11 July. 3 hrs tonight. Total 9 hours. Quicker than I expected. Tournament legal. Only two parts were real work. Which is exactly what Shawn wants. Onto next vehicle. Shawn wants vehicles painted first.
Critique away.
The stippleing stripes look good, but I'm just not digging the colors, especially the grey. The brass also is very bright with no shading which makes me sad. Are you concerned about the left reat of the hull and the two plates that aren't lined up like the right side?
ReplyDeleteGreat insight, Spyrle. The two plates on the left rear of the hull screamed at me the entire time I was painting. I'm sure one of Shawn's boys put this model together. Shawn has better attention to detail than this. You're seeing the "good" side of the model. The other side of the model is horrible.
ReplyDeleteThank you for the compliment on the stippleing stripes. Any suggestion on how to make the colours?
The Gray just looks like it's not done, like it's just primer. I don't know what the rest of the Army looks like so it's tough to say what I'd replace it with.
ReplyDeleteAs for the brass, I would's have given it a wash to put some shadow's in the recesses and maybe a drybrush of burnished gold or 50/50 of the brass and burnighed gold to give some highlights to the brass colors.
hmm, yeah the grey does look like its not done.
ReplyDeleteOriginal idea was to do a Badab Black wash over all the Brass so it would mute it. As you mentioned give it some depth as well. Perhaps I'll put it back on the bench and give it a quick wash. Shouldn't take too long.